NTNOA Info-Library
CarburetorsStereo Sync
/ Resetting TriDent & Rocket 3 Carbs / Setting Carbs
/ Smooth that
Idle Return to Library Contents BUSHMAN'S CARB TUNING SECRETS This is an exceptionally comprehensive description of an AMAL Concentric carburetor and how it works. The article and instructions are provided as general information for
enthusiasts working with AMAL carbs on British Motorcycles. Synchronizing carbs on a twin isn't difficult. The payoff is a bike that sounds better. THE PRINCIPLE Idea main idea is that when commanded to, both carb slides should be open the same amount and shut the same amount. Why be concerned? Well it’s necessary so that both cylinders produce the same amount of power. Besides synchronized carburetors, there are other variables besides throttle opening that determine the power putout by a given cylinder on a given power stroke. For instance, valve condition. No two valves are ever going to seal exactly 100% the same. This goes for rings, piston clearance, cylinder condition, spark voltage, plug and coil condition, and probably some other things as well. So the moral to the story is, don't get carried away with the details. You just want to ballpark the adjustment as closely as possible. A good place to synchronize multiple carbs is at idle. The reason is simple, everyone can tell when an engine is idling properly by the sound. If it sounds good it must be synchronized. So here's what you do: First, you disconnect whatever connects them together. This can be done by merely slacking off the cable adjusters on the individual cables. Then, start the thing up. Hopefully, the above disconnection will still allow a rough opening of all throttles for such, or it will start with an idle throttle opening. If the above mentioned disconnection does not allow a start then advance each of the idle stop screws until the thing does start. Then set it up so that each carburetor is contributing to the running of the motor at idle. You can determine this by turning each of the stop screws down in turn until you find one that makes a big difference to the idle speed. This is the one the engine is actually running on. Turn that screw down until you have the lowest possible consistent idle, then turn each of the others up until it too has an effect on idle speed. Once you are at the point where up movement of every throttle stop screw has an effect on idle speed, you're ready to start trying to make them all the same. One way to do this is to adjust the stop screws until backing one all the way off in turn has the same effect to idle speed as the other. Meaning, if adjusting stop screw on carb 1 back to nothing makes the motor stumble and almost stop, but when you return the idle stop to where it was, and pulling carb 2 back to nothing just makes it slow down a tad, then obviously carb 1 was doing a lot more work than 2; so, advance 2 some, and back 1 off some. At this point, count turns by the 1/4 turn as you adjust back and forth. Adjusting is the keyword here. While you're here, set the idle mixture screws. Once a given carburetor ia admitting air through its slide at the low speed level, adjusting the idle mix screw is supposed to make a difference also to the idle speed. At least, all the books promise this. It is amazing how seldom this actually has the promised effect. With the motor idling as slowly as it will, try moving the idle mix adjusting screw on carb 1. The idea is to find a position with which the motor speeds up. If you can actually find one, then drop the newly sped idle back to original by letting back on that carb's throttle stop screw. Then try again, once or twice, and maybe you can even get the speed up more, and back off again on the throttle stop screw. Do the same with the other carb. Once you're here, you're ready to put it back into riding mode. To do this, the bike idling, tighten each throttle linkage (from the twist grip, not the idle stop adjustments) until the motor begins to speed up, then back off until slack is barely perceptible. Once you've done all three, check to make sure you haven't made anything too tight by blipping the throttle a couple of times. If it's slow in coming back down to idle, or if it doesn't come back down at all, then one or more of the linkage elements is too tight, slack them off, making sure that the mechanical slack, or lash, is the same for both. And that's all there is to that. Edited form the Internet Return to Top of Page
Resetting TriDent & Rocket 3 Carburetors Reproduced from the Triumph Workshop Manual Ref 99-0887 1. The carburetor assembly must be removed from the machine in order to synchronize the throttle slides. 2. Arrange the carburetors and inlet manifold assembly, less air filter on a work bench. View the throttle slides through the engine side of the carburetors, and adjust the throttle stop screw until one side is open approximately 0.010 inches. Compare the other two slides, and adjust the slide heights by screwing the individual adjusters (one on top of each carburetor) clockwise to lower the slides, and anti-clockwise to raise the slides. There is a locknut on each adjuster, and this should be tightened when the adjustment is completed 3. The difference in slide heights is easily visible owing to the slide opening characteristics. 4. Turn each air screw fully in, and unscrew them 2 1/2 complete turns to obtain the approximate fuel/air ratio at idle. Turn the screw clockwise to enrichen the mixture and anti-clockwise to weaken it. 5. Refit the carburetor assembly to the machine and adjust the throttle stop screw to give an idle of approximately 500 r.p.m. 6. Adjust the throttle cable to remove any excessive slackness. The adjuster is situated at the carburetor end of the cable. NOTE: The Haynes Owners Workshop Manual says much the same. Return to Top of Page
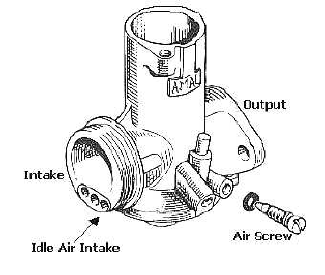
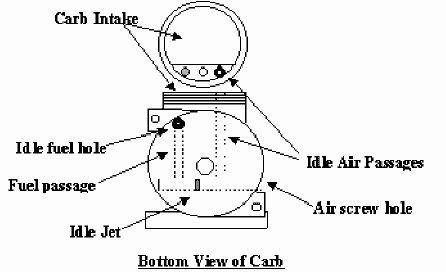
VIKING EXHAUSTS. PAUL and SANDRA BRYANT Telephone/fax 0064- 7-824-4961 Orini Road. R.D. 2 Taupiri. A/H 0064- 7-824-4963 Waikato, New Zealand. 2171. E-Mail address: paul@vikingexhaust.co.nz This article is written primarily for setting up the carbs on Tridents, but the principal is the same for twins or any slide carbs. There are four main area's of setting up carbs, 1) The idle circuit, controlled by the air screw, (the horizontal screw on the side of the carb) this sets the mixture for starting and idling, the setting that is required is a mixture of just enough fuel/air to keep the pistons going up and down, a lean mixture, to achieve this firstly set the engine running just above idle by screwing in the idle screw (screw on an angle on the side of the carb) or in the case of the Trident the main idle screw on the left side of the carbs, now simply screw the mixture screw in, and then out slowly until you get the fastest idle on this cylinder, it does not mater how many turns in or out this may end up being, what is important is that you have the highest revs on, now back off your idle screw until you get the right idle speed, repeat this on the other two carbs, you might have to go over them a couple of times until you get it sussed. When the idle mixture is spot on you should be able to open the throttle just a smidgen, only just twisting the grip a fraction, and the revs should rise to about 2000 R.P.M. 2)The cut away on the slide, this affects the transition between the idle circuit and the next circuit, the needles and needle jet. The cut away on the slide determines the velocity of the air travelling underneath the slide, and therefore the amount of fuel that is drawn up from the jet block into the engine. A lean cut away (a larger cut away) will give less velocity so therefore less fuel. An indication of a lean cut away is that as the throttle is blipped off idle the engine will spit back through the carb, the cut away is to big. Some times if you feel you have a lean situation at the cut away, slightly richening up the pilot circuit can ease the problem, remember that each circuit overlaps the next. The cut away is very rarely changed, unless there has been major motor modification, or the original carb is changed for another. (eg. Mikuni or Dellorto). The standard cutaway for the T150 is 3 1/2, which is stamped on the bottom the slide. The T160 has a no. 4 cutaway, which with an open pipe will be to lean, giving a flat spot just off idle, change this to a no. 3 1/2 cutaway. As a matter of interest the numbers relate to 1/16", so a no. 3 cutaway is 3/16", a 3 1/2 is 3 1/2 1/16" (make sense!!!) Mikunis are probably in metric eg. millimetres or parts there of. 3) The needles and needle jet, this controls your whole mid range, and has the most effect because this is the range you ride in the most. The first thing is to ensure that these two components are either new or nearly new, for example the needle jets come in 3 sizes .105,.106+.107, these numbers relate to thousands of an inch in diameter eg. a 106 jet is .106" in diameter, changing the size of these jets is never done, it is a very coarse means of adjustment, so when these jets (or the needles) wear they have a major affect on the running of the bike (excessively rich). By the way you can not SEE if they are worn! Depending on the mileage that you do these should be replaced every year or so. To check the mixture is correct in this range, when riding the bike at say about 120KPH. roll the throttle on, if the bike hesitates and doesn't move out, it is lean, you are giving the engine more air (by opening the throttle) but there is not enough fuel to go with it , so it hesitates, raising the needle up will allow more fuel to be delivered. If when you roll on the throttle the engine coughs or surges, it is to rich, you have given the engine more air, but to much fuel is being delivered, to set this right drop the needle to decrease the amount of fuel. Each notch on the needle moves the needle approximately 1mm (.040"), if you want to get fussy you can make shims of 1/2 a mm (.020") and fit them under the clip on the needle to get settings halfway between (I am down to .010" shims on my T160) T160s have leaner needles than T150s, so as with the cutaway on the slide, when opening up the exhaust it is advisable to fit T150 needles. 4) The main jet This controls your wide open running, to set this you need to sit on full throttle (not full speed) say in 4th gear for about 1 minute, pull the clutch in and kill the motor, pull over to the side and pull out all 3 plugs, a white plug is lean (dangerous) indicating a need for a bigger jet and a black plug is rich, the jet is to big. The standard main jet in a Trident is 150 . With a three into one or an open pipe you will probably have to go to 180 or 190 jets, experiment and see how it goes. When you are out riding the bike and you are riding pretty fast, if you find that if you back off the throttle a little that the bike actually accelerates, the main jet is probably to small, what is happening is that you are running under a lean condition and when you back off the throttle cutting back the air, the mixture actually comes right and therefore the engine produces more power and accelerates, so you need to go up a size in main jets. The AMAL main jet sizes are rated by fuel flow, a 200 jet will flow more fuel than a 150 jet, Mikuni and Dellorto jets are determined by diameter, a 150 jet is 1.5mm in diameter, a 145 jet is 1.45mm in diameter. One problem that arises is that as your knowledge of carburetion increases and you begin to notice finer differences, you will notice a need for retuning between seasons. This is relative to the difference between riding at night or during the day, at night the air is colder therefore denser, more oxygen which makes the fire burn better, same as Humans, the more oxygen the brain receives the better it functions. The sequence of setting up your carbs is to do the idle mixture first so that it will start and run, then do the main jet, the fuel goes through the main jet before it goes through the needle jet, so if your main jet is to small it will restrict the fuel flow to the needle jet, then do the needle settings. One other thing is to synchronise the three carbs, this is best done with vacuum gauges which measures the vacuum in each port, if you don't have access to this equipment, you can try opening the carbs to wide open and feeling each slide with your finger, adjust each slide until they all feel about the same. The biggest problem with AMAL carbs is that they wear terrible. Don't get me wrong they are good carbs, they just need to be set up right. If when you are doing the idle mixture, you can not control the revs the carbs are shot, what is happening is that air is leaking around the side of the slide where it is worn. There are three remedies, 1) Buy new carbs, expensive and a year later you will be in the same boat.(the easiest option) 2) Change to a different carb (Dellorto or Mikuni) 3) Get your carbs resleved, this is better than buying new carbs, the reason that they wear so much is that the body and the slide are both made of the same material, when the bodies are bored out and the slides are sleeved with brass or stainless steel this overcomes the basic problem and the carbs are then good for many years, I did my carbs over 8 years ago and they are still good! One other thing to check is the air filter element, if this is dirty, clogged or old, replace it! If the filter element is blocked, this will restrict the air flow making the engine draw more fuel, causing it to run rich. The Trident really responds to having a balance pipe fitted between the three carbs (as per the twins) this really takes the fussiness out of setting up the idle, with a balance pipe fitted the engine will idle smoother and generally run better at low speeds. Before you do any work on setting up your carbs ensure that the tappets are set correctly and the timing is spot on. If you have any problems give me a ring and we should be able to sort it out. Initial settings for a three into one, 180-190 main jets, T150 needles, 3 1/2 slides, idle screw start about 2 complete turns out. These settings are a ballpark only, T160s are setup lean from the factory so by fitting an open pipe the carbs will be very lean, you will definitely be better off with the T150 needles and slides, the mains you will have to experiment with, I have had up to 200 and 210 mains in Triples so see how you go. Paul Bryant Engineering, Artistry and Craftsmanship. Return to Top of Page When that 25 year old Brit bike won’t idle it makes for tedious riding. Lots of throttle twisting is needed for every start and every stop. Since that Amal Concentric is the mediator between your wrist and the engine, twisting the grip from idle feels like each rev has to be coaxed to life, not one emerges willingly. If your bike has twin or triple cylinders, the problem is magnified. Getting that Amal to do what you want is easier than you think with basic cleaning and some passageway orthoscopy. The Amal has a variety of passages that need to be clean. So strip the carb of all the parts that can be removed and clean them in Berryman’s Chemtool Carb Cleaner. That’s the noxious stuff in the gallon can. After that’s done wash the parts with 409 or Simple Green and water. Now comes the best part.
All the books say not to ever stick anything in the holes of jets for fear of changing the size of the opening. Well, I don’t recall reading about how to dislodge bits that air can’t push out. Here’s a safe but sure way to ream those micro holes and not harm their dimensions. Peal off a strand of old throttle cable. Its steel, strong and once you remove most of the wiggles with some pliers, it’s the best jet reaming tool around. Oh yeah, you’ll have plenty more for the next time. Take the wire and work it down the air screw passage. The wire has to get to the center of the jet and penetrate. Depending on the type of material clogging the jet, spray carb cleaner can be used to soften it. If it’s a solid bit of rust or dirt then you’ll have to feel through the wire, wiggling and jiggling to get the wire to push through the clog. You know you have it through when the wire will stay put in the jet hole. Now blow the obstruction out by blowing compressed air into the air screw passage the crud will easily find its way out. Do the same with the two micro holes in the throat. One last thing to do is ream the idle fuel passage too. Always blow from the air screw & micro holes. Douche the holes & passages with carb cleaner & dry with compressed air. Look down the air screw passage and confirm the idle jet is clear. Blow air into the intake side idle air passage and feel that there are two streams of air exiting the micro holes. The job is done. Put it back together with a good gasket, mount the carb and adjust. Be ready to enjoy a bike that ticks over, patiently waiting for you to take her for a ride. CautionsProtect your eyes from high speed flying bits and toxic chemicals when blowing with compressed air. Extra BenefitNow that you have a throttle cable with loose strands, why not peal some more off and send to your Brit bike friends as birthday or Christmas presents. They’ll be glad you did. Return to Top of Page Disclaimer: The following information has been collected from various sources on the Internet and publications for the expressed purpose of providing NTNOA members with useful information for the enjoyment, maintenance & preservation of old British & European motorcycles. While the information is intended to be as accurate as possible it can not be guaranteed to be 100% correct, therefore the reader should use good common sense and safety before implementing any of the suggestions and ask questions if in doubt. Copyright © 2000 NTNOA All rights reserved. |