|

Engine
Unraveling the Mystery of the Boyer Ignition
No Spark Check
Engine
Break-in Procedure
Wet Sumping fix
What does Desmo mean?
Stripped Threads
Lodge H1 Spark Plug
Stuck Pistons
De-Carbonize
Heads
Return to Library Contents
by Bill Whalen, BSAOC
Reprinted from the Chicago N.O.C.
Mar-Apr Newsletter
On the BSA Club’s recent North Coast ride, a problem came up with the electronic
ignition installed on one of the Nortons that invariably tag along with us BSA riders. It
seems that the Norton ran fine until we pulled into the motel parking lot in Fort Bragg,
where it died and refused to start again. About fourteen of us helpful BSA Club members
proceeded to shove the rider out of the way and try to troubleshoot the problem for him.
Two things were immediately obvious: ‘first, fourteen people cannot work on the same
bike at the same time, and second, everyone had a different opinion of what the problem
might be and how to proceed. To make a -long story short, we finally reached a consensus
that the Boyer electronic unit was faulty and we needed a replacement.
After several calls to the Bay Area, a new unit was located, in, of all places, a
Ducati dealership in Ukiah. The only problem was that it was a BSA-Triumph unit. This
sparked a new debate among the enlightened: Would a black box from a BSA-Triumph unit work
on a Norton? After much discussion and several phone calls, which I understand reached all
over the country, the answer game back that, yes, you can substitute the Mark III BSA unit
for the one fitted to the Norton. Why, then, do they market the Norton unit separately
from the BSA-Triumph unit? Also, why do some BSA-Triumph units turn on with the
ignition switch and stay. on, while Norton units not come on until triggered, and then
turn back off? Is there a difference in the advance curve?
These questions point out one of the only problems that I have found with electronic
ignition systems. They are generally .so reliable that once they are correctly installed,
we tend to just forget about them, and since their failure rate is so low, we don’t
get much experience troubleshooting them. In addition, there doesn’t seem to be much
information available on how to test than if we suspect they may be causing problems.
Well I decided that I would attempt to correct this problem, if possible who better to
answer these questions, I thought, than the folks at Boyer? I have talked to them several
times over my many years of using Boyar ignition units, and have always found them to be
very helpful and friendly, especially when they know that you are knowledgeable in
electronics and are interested in their products.
In order not to waste their on the Norton (kickback), the time and my money, I decided
to make a list of questions that I would like to have answered. I called the Boyer Company
early one morning, As luck would have it, the person who answered the phone was just the
person I needed to talk to, a very knowledgeable and helpful Ernie Bransden. Here are the
answers to some of our questions, with a little history to boot.
The Boyer Bransden Co. is a small concern supplying ignition systems not only for
motorcycles, but for all sorts of pumps, motors, lawnmowers, etc. Yes, indeed, there were
Mark I and Mark II Boyers beginning back in the late 60’s. The Mark I was the first
model, and was fitted to racing Triumphs in the late 60's. It was considerably bigger than
the present units, the black box being about 4" by 5".
Then came the Mark 11 unit, which must have been very small and compact, as the whole
unit fit inside the points housing of a Triumph. This approach was dropped, possibly
because of heat and stability problems, and the Mark III unit was the result. I have
personally never seen either a Mark I or a Mark 11 unit. Since becoming a convert to
electronic ignition about ten years ago, all my experience has been with the Mark III
units, of which there have been several versions.
Ernie informed me that the early Mark III units were different for the Norton. Because
of starting problems on the Norton (kickback), the current to the coils remained off until
it was turned on by a trigger from the pulser coils when the engine was turned over. It
would then turn back off in a second or two if no further pulses were received.
The BSA-Triumph unit, on the other hand, had current to the coils as soon as the
ignition switch was turned on. The later Micro Mark III units are all the same; they
remain off until triggered on, and then they will turn back off in a second or two if no
further pulses are received. This is what they call a "soft turn off": it
doesn't produce a spark at the plugs, it just turns off the current to the coils. A good
idea, if the key were left on. All of the Boyer units produced in the last few years are
of this type.
All units have the same basic-advance curve, which is controlled by the trigger pulses.
I'm not going to get into the theory of how the advance is produced, but you will notice
when you put a strobe light on the bike during installation of your Boyer that the unit
keeps on advancing with increasing RPM, unlike the mechanical advance unit you are
replacing. The mechanical advance unit has reached its full advance by about 3000 RPM,
whereas you time the Boyer at 5000 RPM. This is not a problem, only a difference between
the two systems and how the advance is produced. And remember, that mechanical advance
unit was the Achilles' heel of many a British bike.
Now that we know a little more about how they work, we can talk about how to check them
out if we suspect they may be faulty. The first thing you must do is to forget about
what's inside the little black box. It doesn't matter. That little black box does only two
things: it turns the current to the coils on and off, just the same as the points did in
your old system, and it provides spark advance. That's it's only job. If it stops doing
that, it's bad.
Remember back when I said that once correctly installed, they generally work fine?
Well, most of the time when someone has trouble with his electronic ignition, it goes
something like this.
"I dunno wha happend, it just quit. I wus reel curful when I put tha sucker in! I
twisted ever wire, and even double wrapped it wit lectricians tape, and I smashed ever
connecter wit my hammer!"
No, that's not what I meant when I said correctly installed! Most of the problems I
have encountered with Boyer units have been the result of bad connections. Every connector
must be clean and tight, and even though the spade connectors that come with the unit are
pretty good, after I crimp them on with the proper crimping tool, I solder them just to be
sure. Remember, every connection is critical, even the ground connections. So, what I'm
suggesting is that if you encounter problems, first, take a good look at all of the
connections to make sure they are still in place. Let's take a look at the schematic of a
typical positive-ground installation.
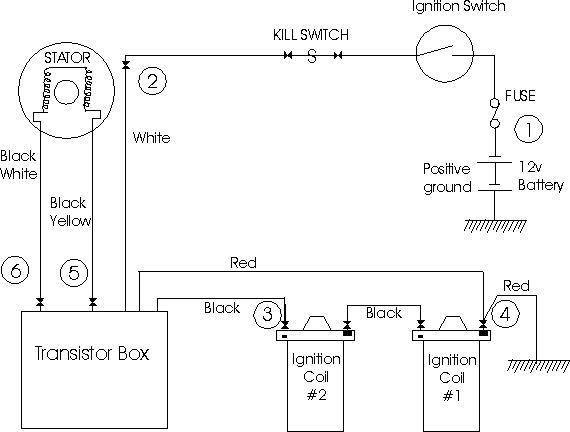
Notice that there are only five little wires going into the Boyer unit; two, BM and BN,
are used for the trigger circuit, white is the 12v supply, red is ground, and the black is
the switched 12v to the coils. Pretty simple, huh? But take another look at the white
lead. The power in the white lead goes through 11 different connections getting from the
ground side of the battery to the Boyer! It must also be capable of carrying between 3 and
4 amps of current! A bad cell in your battery or a bad connection anywhere along this path
can cause you problems.
In order to understand why a bad connector has such an adverse effect on the circuit,
again take a look at the schematic. Notice that the only resistance in the path from
ground through the coils, the black box, the kill switch, and the ignition switch to the
battery, is the resistance of the coils themselves. Each 6v coil has only about 1.5 to 2
OHMS, so the total resistance should be 3 to 4 OHMS. Remembering that I=E/R, this is where
we come up with 3 to 4 amps. Put a few extra OHMS in there and you can see what happens.
That is the reason that all the connectors must be in good condition.
Enough about connectors, I'm sure you got the point by now. Let's get on with some
troubleshooting.
Again looking at the schematic, we can break it down. to four basic sources of trouble.
(1) The black box itself, (2).The 12v supply to the box, (3) The coils and plugs, and (4)
The triggering circuit. Here are some trouble shooting hints recommended by Bayer that may
help isolate a problem.
Simple tests on Bayer Mark III Ignition Units for British Motorcycles.
1. Switching on the ignition switch and turning the engine over should produce a
current through the coils, (a voltage at point (3)). No current through the coils could be
caused by:
* No voltage to the white wire at point (2). (Battery voltage low, less than 9 volts.)
* Bad connections, anywhere in circuit.
* No earth to red wire at point (4).
* Coils or link wire between coils open.
* Black wire shorting to ground, or one of the coils shorting internally. Black box
very hot.
2. Wires can rub through to frame. Check for any shorted wires.
3. All battery cells should be in good condition, as a poor cell will produce a high
resistance in the 12v supply to the ignition unit. A bad battery cell can cause the
ignition to produce a spark on switching the lights on or using the horn. A bad battery
cell can also cause a continuous stream of sparks to occur.
4. A simple test of the transistor box can be made with the box still in the I circuit
by disconnecting the yellow/black and the white/black wires at (5) and (6), and with the
ignition on they can be touched together and broken. This should produce a spark at the
plugs. If it does not, the box is faulty.
These are some pretty good suggestions, but I would add a couple of my own gained
through my own experiences. The first thing I do if I suspect I have a problem with my
electronic ignition system is to either pull one of the spark plugs or one of the plug
leads and connect it to a spare plug. I hold the plug against the head while someone else
turns the engine over. I should see a spark at the plug. If not, I need to isolate the
problem further.
Luckily, you don't need any fancy tools or equipment to troubleshoot your ignition
system. You can do a lot with just a piece of wire and a 12v bulb. If I had a Volt/Ohm
Meter things would be simple, but let's assume that I left my meter at home. I usually
carry one of those little 12v test lights with me, but you can also use any 12v bulb and a
piece of wire.
A simple way to eliminate all the wiring, switches and connectors in the 12v feed to
the box is to take a piece of wire and connect it between the (-) negative side of the
battery (1), and the white lead to the box at (2). This will eliminate the ignition
switch, the kill switch and any other connectors in this line. If this solves your
problem, and you now have a spark when the engine is turned over, you have a bad ignition
switch, a bad kill switch or (what else?) a bad connection!
With this same piece of wire, you can test your coils and plugs. Simply disconnect the
black wire from the box to the coils at (3), and then, with one end of the wire connected
to the battery at (1), touch the other end to the (-) negative coil terminal (3). When you
break this connection, you should see a spark at the plugs if your coils are good. If this
does not produce a spark, check the coil wiring and (what else?) the connections, all the
way from ground to point (3). If all connections are OK then you probably have a bad or
open coil.
If tests 1 and 2 don't solve the problem, try the Boyer test #4 above. If you now have
a spark, then you probably have something wrong in the triggering circuit, a broken wire
or (what else?), that's right, a bad connection. Also, check to make sure that the magnet
behind the pick-up plate is turning. Don't laugh, I saw' it happen once when the bolt
holding it in the cam came loose.
In conclusion, let me say this about working with electronic circuits. If the circuit
fails, it is usually fairly easy to find the trouble. The tests above will probably be
sufficient to identify your problem. In practice, however, life is seldom so simple. Most
of the time the problem comes and goes intermittently and can be very difficult to
identify. One of the easiest ways around this is to substitute parts, one at a time, until
the problem goes away.
The problem with the Norton on our ride was that it would produce only a very weak
spark at the plugs. It required a voltmeter to determine that the box was turning on and
off all right but the output was only about 6v instead of 12v. Replacing the box solved
the problem. I think we all learned a little from this one.
Bayer has recently released an improved version of its electronic ignition. It uses a
microprocessor based digital ignition unit. it is claimed that the triggering circuits are
more stable, especially at low speeds, giving better idle characteristics. Starting should
be improved, and the advance curve can be precisely programmed.
This article was taken from the "NORTON NOTICE". A newsletter of the Northern
California N.O.C. Special thanks to the Editor, Alan Mueller.
NO SPARK CHECK:
BATTERY HAS POWER?: Switch on headlamp and activate stop lamp. They should
stay bright for more than one minute.
THE FUSE KEEPS BLOWING: Replace the fuse with a 21 watt indicator bulb. As the
individual electrical circuits are switched on, the bulb will glow dimly, if a
faulty circuit is connected, the bulb will glow brightly. If the bulb glows
brightly with nothing switched on, remove wires from components in turn until
the bulb goes out; the last one removed will be the faulty circuit.
IGNITION UNIT HAS POWER?: Using a bulb or voltmeter check the main power feed to
the ignition unit. This would be the wire from the ignition or kill switch. With
bulb connected between the ignition feed wire at the ignition box and battery
ground, the bulb should glow brightly. If dim or varying, try moving the fuse
holder, wiring, handlebars, to locate any faulty connection.
Then test between the ignition feed wire at the box and the wire used to ground
or earth the ignition system. If the bulb glowed brightly when connected between
the feed wire and battery ground system, but is dim when connected between the
ignition feed wire and the wire used to ground the ignition, you have a faulty
ground. (The bulb draws similar current to the ignition and is a more useful
test than the voltmeter only.) Poor earth connections are hard to locate.
THE UNIT HAS POWER – SPARKS ON SWITCHING ON AND OFF: Most early MKIII (not
Micro-MKIII, Micro-Digital or Micro-Power which will not spark when turned on
and off) ignition units will produce a spark on switching on and off; if this is
so and sparks are produced on all cylinders then the ignition coils must be in
good order. If one or more fail to spark, a coil could be faulty. On four
cylinder machines try disconnecting one coil at a time, and switching on and
off, checking for sparks. On other machines that use more than one coil in
series one coil failing can stop sparking due to coil failure and cause all the
coils not to spark.. Also one coil can have an internal short to ground, and
while it will fire, it can cause the coils after it in the chain (which are in
good working order) to stop working. This is very common when a Lucas/PVL coils
that are over tightened in the metal clamp. The case becomes crushed and touches
the windings inside. This can occur when the coil warms up. The Micro-MKIII,
Micro-Digital and Micro-Power units all turn off when not being triggered,
therefore, it is best to carry out the next test as you may not always have a
spark on turning on and off.
THE UNIT HAS POWER – NO SPARKS ON SWITCHING ON AND OFF AND NO SPARKS WHEN
CRANKING: After performing the bulb test above to ensure the box has power,
disconnect the wires from the ignition box that go to the pickup trigger plate.
With the ignition on, touch these two wires together. Making and breaking the
connection should make a spark at the spark plugs. If no spark is present then
the ignition box is most likely (see checking coils above) faulty. The only
units that will not trigger in this way are the racing crank triggered Digital
and Norton rotary units (A rapid tap on the end of the pickup will induce the
ignition to fire. A single tap will arm the ignition, but if it does not see
additional signals after a few seconds will turn off the box and inadvertently
fire the coil). Check that the rotor magnets are running within the two metal
pole pieces on the trigger plate. On British machines it is possible to move the
rotor out slightly by placing a thin metal shim around the taper. The ignition
will not fire by hand at less than 200 rpm.
CHECKING THE PICKUP PLATE: A full visual check of the condition of the circuit
board and coils looking for loose or broken parts. Check for signs of the rotor
touching the solder connections. Using a multimeter check the resistance of each
pickup coil (should be approx. 65 ohms or 130 ohms across the two coils) and the
total resistance across the wires or terminals. With the meter still attached,
run your fingers around the coils, if the resistance changes there could be a
broken winding inside. Attach the meter across the trigger plate’s wires and
pull on them. If the resistance changes you could have a broken wire.
CHECKING THE ROTOR: The magnets on the Boyer ignition rotor should just hold the
weight of the rotor when placed against a piece of steel. Check the marking
spots are the same way around. All magnets should have a similar amount of
strength.
SPARKS ON CRANKING BUT WON’T FIRE: Check the pickup wires do not change colour
in the wiring loom, as swapping these will make the ignition fire over 50
degrees retarded. With the digital system, check that you have suppressed plug
caps fitted of approx. 5,000 ohm. If timing has just been done, don ‘t forget
that the timing angle on the camshaft is half of the crankshaft’s (i.e. on a 650
Triumph full advance timing is 38 degrees but is set at 19 degrees on the
camshaft.)
CONTINUOUS SPARKING WITHOUT CRANKING THE ENGINE: A poor battery with a battery
charger connected or one or more bad cells in the battery. A high resistance in
the wiring circuit or earth return. Check that the engine is earthed back to the
frame and battery circuit. Plastic (powder coated) frames must have a good earth
connection to the engine case and battery. A wrong type of ignition coil with a
very low primary resistance (under 2 to 3 ohms) will draw a very high current
and produce a large volt drop across the wiring. All these will keep turning the
ignition on and off, generating a chain of sparks.
ENGINE RUNS FAST AT IDLE AND KICKS BACK ON STARTING. Poor fuse connection,
battery running low or variable voltage to the ignition. As the alternator
charges the system with increasing engine speed the problem can clear. But as
the engine speed decreases the system voltage drops and the problem reappears as
the motor returns to idle.
ENGINE RUNS (POOR STARTING), BUT MISFIRES: Poor connection at rivet attaching
terminal of ignition switch or bad connection vibrating on and off. Also
suppressor plug caps with open (internally broken) circuit.
Return to Top of Page
What does Desmo
mean?
You’ve heard the term every time someone with a 2 wheeled Italian stallion rolls
up. The S that sounds like a Z gives it an exotic ring. Here’s an
explanation from a chap from down-under (D.Grant).
 Desmodromic valve operating mechanism is where the camshaft controls both the opening
and closing of the valve. One benefit of this is that when the motor is over-revved,
the valves are still controlled, whereas when the are returned by springs, then the valves
can "float" and hit the piston. Another is that the manufacturer can use wilder
cam grinds for better performance.
Desmodromic valve operating mechanism is where the camshaft controls both the opening
and closing of the valve. One benefit of this is that when the motor is over-revved,
the valves are still controlled, whereas when the are returned by springs, then the valves
can "float" and hit the piston. Another is that the manufacturer can use wilder
cam grinds for better performance.
Ducati and Mercedes are two major companies who have used the desmodromic system in
racing engines. Ducati has the most experience of any manufacturer in the world at
successfully applying desmodromic valve control to production machines.
Note that in the diagram, the springs are only used to close the valve the last
0.005".
Valve clearances are adjusted by shims. The rocker arms have to be removed to insert
the shims.
Return to Top of Page
Stripped
Threads
Ever discover that there are some stripped threads on your aluminum transmission case?
Here is how to repair the situation.
The Helicoil is the commonest type of thread replacement and is simply a spring-like
coil of diamond profile wire (i.e. it's shaped like a diamond if you look along it) which
terminates at one end in a straight bar that cuts across the diameter. A Helicoil drill
bit which is slightly larger than the original hole is used to run down the hole to remove
the remains of the original thread. A Helicoil thread tap is then run down the hole,
cutting a new thread. The Helicoil itself is then wound down the new thread by means of a
cylindrical drift with a slot in its end that holds that straight bit of the coil I
mentioned earlier. The outer wedge of the diamond wire binds in the newly cut thread,
while the inner wedge of the diamond provides the pitch of the new thread. Because it's
made of springy metal stuff, it expands to fill the hole in a nice tight fit. Once in, you
simply bash the end of the winding-drift with a light hammer, to break off the straight
metal bar on the end of the coil, since its done its job and isn't needed. Because of this
last operation, it isn't possible to reuse Helicoils. An old drill bit works good to break
off the tang. Use one that fits snugly in the Helicoil and insert it point up and bang it
with a hammer. That way you have a "drift" that fits correctly in the hole. Of
course hitting the point isn't good for the bit, but it will be still good for drilling
wood around the house.
The bad news about Helicoils is they sometimes wind themselves out of their own thread
when you try to take bolts out of them, because they tend to grip the internal thread of
the bolt.
In effect what the Helicoil does is remove the original thread and replace it with two
new threads side by side, one of which it grips, and the other of which it provides
itself, via its inner surface. For small (1/4 to 1/2 inch) threaded holes, they work very
well. Above this size, and they start to give trouble, by not binding into their holes
properly, breaking up inside the holes, or gripping the bolts instead of the inner
threads. Sleeve type inserts are a better choice for repairing larger holes.
Helicoils are available for spark plug holes but there are strong opinions to avoid
them here. It's very easy to drill out the old thread in the cylinder head at the wrong
angle. When that happens the spark plug will not seat properly. A good alternative is for
spark plug holes is the Timesert, which is a special type of sleeve insert. This comes
with its own stepped tap to cut the new thread. This tap is ingenious because the lower
portion of the tap is threaded, so that it can be led into the remnants of the damaged
original thread, thus ensuring that the alignment is correct before the second half of the
thread follows on behind and cuts the new thread. Care is needed, if the original thread
is in a bad way, but it's much easier than the drilling and re-tapping from scratch option
that is needed for Helicoils.
By the way, Timeserts are available in the US, along with other brands and variations
Keenserts and Recoil.
Edited from the Internet
Return to Top of Page
Lodge H1
Spark Plug
The spark plugs of today are not what they used to be. The famous Lodge H1
spark plug really had character. You never knew whether they would fire or not. If they
didn't, it was just a matter of whipping out a spanner, disassembling it (yes, they came
apart!), cleaning it, and re-assembling it. That usually got you on your way again.
Stuck Pistons
Time, patience & some oil go a long way.
Remove the heads & every day pour some very thin oil on the tops of the pistons.
The idea is to have the oil form a puddle and leak past the rings. Hopefully this will
require periodic topping up. A good indication of leakage. At every top off visit, whack
the tops of the pistons with a wooden mallet before replenishing the puddles to try to get
some movement. As soon as there is the slightest perceptible movement you know you have
won. The next step is to rock the crank back and forth as much as it wants to turn. Keep
this up until the barrel can be removed.
If you don’t have the patience for all this, get tough. This means heating the
barrel with a torch to get things bigger. Find a nice piece of oak like from an old hammer
and have an assistant, preferably someone with strength, hold the engine off the ground by
the barrel. This gives the bottom part of the engine a place to go on impact. Use a 3 pond
mini-sledge hammer & hit the pistons sharply through he wood drift. After awhile
you’ll be able to determine if the combination of heat & hammer will free the
pistons. If not then the next step is to drill out the pistons. Use about a 1/4 inch bit
& drill around the sides of the barrel. Be careful not to damage the cylinder walls.
Apply some more heat & hammer. The pistons should come free. Try to disintegrate the
piston as much as possible because the cylinder skirt has a habit of cracking when the
piston is hammered though.
AND Another Method.
I too have used the above method on a stuck MGA motor once but I have found
a much safer and easier way. I worked as a mechanic in a Triumph/Norton
dealership in OKC during the 1980s. Every spring we would see a rash of bikes
with stuck pistons. We found this was mainly due to long term storage in a
garage with an unvented drier. The cylinder with the open valve would rust up
and cause the piston to seize.
By putting air pressure on the cylinders we found that we were able to fix these
rust related lockup problems. We made a tool out of a spark plug and a air chuck
nipple. After removing the insulator from the spark plug and welding the nipple
onto the remaining threads we could attach a compressed air line to that
cylinder. Before this was done however, we backed off the valve adjustments so
that the valves would close. In the case of a Triumph we would remove the rocker
box and for Norton's we would back off the adjuster and using a screwdriver
depress the rocker and valve enough to remove the push rod from that rocker.
Once the valves were closed we would fill the cylinder with several ounces of
WD-40 and put 110 pounds of air pressure on that cylinder. The air pressure
drives the oil past the rings in a way just sitting never could. It takes just a
few minutes and then you hear a swoosh and the pistons glide to the bottom. You
don't pull the head and you don't beet on the piston crowns.
I was thinking about joining the NTNOA again. It has been over 10 years since I
was a member. I still keep a Norton as a pet but I have been made very poor by
the economic downturn and I have not had the funds to tag and insure the bike
much less pay club dues. To my credit, I have managed not to sell the bike. This
is my Norton. I built it for me and I am in the process of fixing every shitty
thing I know Nortons do. I really never want to sell it. Let the other guy sort
out his own Norton!!
James Ingram
Ingram and Friends
A Print, Web and Media Resource
http://www.IngramAndFriends.com
I too have used this method on a stuck MGA motor once but I have found a much
safer and easier way. I worked as a mechanic in a Triumph/Norton dealership in
OKC during the 1980s. Every spring we would see a rash of bikes with stuck
pistons. We found this was mainly due to long term storage in a garage with an
unvented drier. The cylinder with the open valve would rust up and cause the
piston to seize.
By putting air pressure on the cylinders we found that we were able to fix these
rust related lockup problems. We made a tool out of a spark plug and a air chuck
nipple. After removing the insulator from the spark plug and welding the nipple
onto the remaining threads we could attach a compressed air line to that
cylinder. Before this was done however, we backed off the valve adjustments so
that the valves would close. In the case of a Triumph we would remove the rocker
box and for Norton's we would back off the adjuster and using a screwdriver
depress the rocker and valve enough to remove the push rod from that rocker.
Once the valves were closed we would fill the cylinder with several ounces of
WD-40 and put 110 pounds of air pressure on that cylinder. The air pressure
drives the oil past the rings in a way just sitting never could. It takes just a
few minutes and then you hear a swoosh and the pistons glide to the bottom. You
don't pull the head and you don't beet on the piston crowns.
I was thinking about joining the NTNOA again. It has been over 10 years since I
was a member. I still keep a Norton as a pet but I have been made very poor by
the economic downturn and I have not had the funds to tag and insure the bike
much less pay club dues. To my credit, I have managed not to sell the bike. This
is my Norton. I built it for me and I am in the process of fixing every shitty
thing I know Nortons do. I really never want to sell it. Let the other guy sort
out his own Norton!!
James
--
James Ingram
Ingram and Friends
A Print, Web and Media Resource
http://www.IngramAndFriends.com
214.532.9876
De Carbonize De
Head
Over time, vintage machinery has the problem of collecting carbon on the heads and this
causes a variety of performance problems when it gets too thick.
Here are some suggestions for cleaning those heads so they can work like brand new.
What Works
For a light accumulation of deposits you can use almost any of the following with
reasonably good results, as long as you are willing to use lots of elbow grease:
1. Carb cleaner
2. Simple Green,
3. Gasket Remover
What doesn’t work
1. Naval jellies
2. Brake cleaner
3. Natural Orange
4. Don’t bead blast (this works but particles can kill the head later on.)
Scrapers / Grinders
A scrap piece of aluminum.
Old hacksaw blade. Scrape with the round end.
Scotchbrite
Dremel tool with wire brush (use eye protection)
Dental tools
Die grinder
Edited from the Internet
Return to Top of Page
Disclaimer: The following information has been collected from various
sources on the Internet and publications for the expressed purpose of providing NTNOA
members with useful information for the enjoyment, maintenance & preservation of old
British & European motorcycles. While the information is intended to be as accurate as
possible it can not be guaranteed to be 100% correct, therefore the reader should use good
common sense and safety before implementing any of the suggestions and ask questions if in
doubt.
Copyright © 2000 NTNOA All rights reserved.
Revised: January 05, 2018
.
|